使用 TensorFlow Lite 和机器学习在 C++ 中实现实时姿态检测


在这篇文章中,我们将深入探讨如何在 C++ 中使用 TensorFlow Lite 来实现实时人体姿态估计,借助从 TensorFlow Hub 下载的专门为此目的训练的模型。我们将构建一个示例,使用 OpenCV 加载视频,然后逐帧处理它,以确定每个图像中人体关节的位置。完成后,我们的应用程序应该看起来像这样1

简短介绍
TensorFlow Lite 是一个专门为在移动设备、微控制器和其他边缘设备上部署深度学习模型而设计的库。TensorFlow 和 TensorFlow Lite 之间的主要区别在于,TensorFlow 用于创建和训练机器学习模型,而 TensorFlow Lite 是一个更简单的版本,旨在在移动电话等设备上运行这些模型。
TensorFlow Hub 是一个存储库,我们可以在其中找到许多经过训练的机器学习模型,这些模型已准备好用于我们的应用程序。对于我们的示例,我们将使用MoveNet.SinglePose.Lightning 模型,但在 TensorFlow Hub 中还有许多其他与 TensorFlow Lite 兼容的模型。一些示例包括
一些基本概念
在深入研究示例之前,让我们简要解释一些基本概念
- 模型:机器学习模型是现实世界过程的数学表示,从数据中学习而来。它用于进行预测或决策,而无需明确编程来执行任务。
- 推理:推理是使用经过训练的机器学习模型根据新的输入数据进行预测或决策的过程。它允许模型将其学习到的知识应用于新的、未见过的数据。
- 张量:用于表示深度学习模型中数据的多维数组。张量是 TensorFlow 中用于表示和操作数据的主要数据结构。
- 形状:张量的维度,描述每个维度中元素的数量。例如,一个具有 3 行 4 列的矩阵的形状为 (3, 4)。
- 通道:在图像处理的上下文中,通道指的是图像的单独颜色分量。例如,典型的彩色图像具有三个通道:红色、绿色和蓝色 (RGB)。
在您的应用程序中使用 TensorFlow Lite
此示例的所有源代码都可以在Conan 2.0 示例存储库中找到
git clone https://github.com/conan-io/examples2.git
cd examples2/examples/libraries/tensorflow-lite/pose-estimation/
在那里,您将找到项目。让我们看一下相关的文件
.
├── CMakeLists.txt
├── assets
│   ├── dancing.mov
│   └── lite-model_movenet_singlepose_lightning_tflite_float16_4.tflite
├── conanfile.py
└── src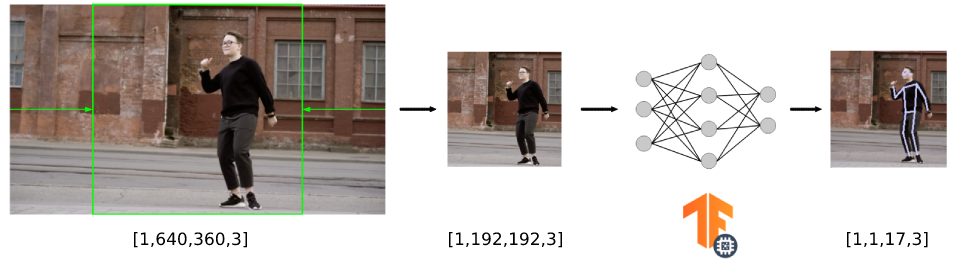
└── main.cpp您可以看到我们应用程序的源代码和CMakeLists.txt、我们将要处理的视频以及我们将加载到 TensorFlow Lite 中的神经网络模型。我们的应用程序对模型运行推理(根据输入数据进行预测)以检测人类关键点,从而提供我们各种身体关节的位置。该应用程序根据以下示意图进行组织

加载神经网络模型
正如我们之前提到的,我们将在示例中使用MoveNet.SinglePose.Lightning 模型。此模型采用.tflite 文件的形式。第一步是将.tflite 模型加载到内存中。此文件包含模型的执行图。此模型存储在FlatBufferModel 类中,您可以使用BuildFromFile 方法并以模型文件名作为输入参数来创建它的实例。
auto model = tflite::FlatBufferModel::BuildFromFile(model_file.c_str());

if (!model) {
    throw std::runtime_error("Failed to load TFLite model");
}接下来,我们构建一个Interpreter——它将获取模型并对输入数据执行其定义的操作,同时还提供对输出的访问的类。为此,我们使用InterpreterBuilder,它将为Interpreter 分配内存并管理设置,以便Interpreter 可以读取提供的模型。请注意,在运行推理之前,我们通过调用AllocateTensors() 方法告诉解释器为模型的张量分配内存。在此块的最后一行,我们还调用PrintInterpreterState,这是一个调试实用程序,可用于检查解释器节点和张量的状态。
tflite::ops::builtin::BuiltinOpResolver op_resolver;

std::unique_ptr<tflite::Interpreter> interpreter;

tflite::InterpreterBuilder(*model, op_resolver)(&interpreter);

if (interpreter->AllocateTensors() != kTfLiteOk) {
    throw std::runtime_error("Failed to allocate tensors");
}

tflite::PrintInterpreterState(interpreter.get());
读取和转换输入数据
现在,我们的解释器已准备好接收数据并执行推理,我们必须首先调整我们的数据以匹配模型接受的输入格式。在本节中,我们将概述以下过程
- 读取输入视频(在我们的例子中,它的大小为 640x360 像素)。
- 裁剪输入视频帧以创建正方形图像(生成 360x360 像素的图像)。
- 调整图像大小以匹配模型接受的输入(我们将看到它是 192x192)并将其复制到模型的输入。
对于此特定模型,如果我们查看文档,我们可以看到输入必须采用“形状为 192x192x3 的 uint8 张量”的形式。通道顺序:RGB,值在 [0, 255] 中”。
虽然没有必要,但我们可以从解释器访问输入张量以确认张量输入大小,在本例中为[1,192,192,3]。第一个元素是批次大小,因为我们只使用一个图像作为模型的输入,所以它是 1。
auto input = interpreter->inputs()[0];

auto input_batch_size = interpreter->tensor(input)->dims->data[0];
auto input_height = interpreter->tensor(input)->dims->data[1];
auto input_width = interpreter->tensor(input)->dims->data[2];
auto input_channels = interpreter->tensor(input)->dims->data[3];

std::cout << "The input tensor has the following dimensions: ["
          << input_batch_size << ","
          << input_height << ","
          << input_width << ","
          << input_channels << "]" << std::endl;
我们希望对尺寸为 640x360 像素的视频执行姿态检测,因此必须先将视频帧裁剪并调整大小为 192x192 像素,然后再将其输入到模型中(为简单起见,我们省略了帧捕获代码,但您可以在存储库中找到代码)。为此,我们使用 OpenCV 库中的resize() 函数。
// unprocessed frames from our video
int image_width = frame.size().width; // 640 in our example
int image_height = frame.size().height; // 360 in our example

int square_dim = std::min(image_width, image_height); // the min dimension is 360 in our case
int delta_height = (image_height - square_dim) / 2;   // so this is 0
int delta_width = (image_width - square_dim) / 2;     // and this 140

cv::Mat resized_image; // this is the input for the model

// crop to 360x360 and then resize to 192x192
cv::resize(frame(cv::Rect(delta_width,
                          delta_height,
                          square_dim,
                          square_dim)),
           resized_image,
cv::Size(input_width, input_height));最后一步是将数据从调整大小后的视频帧复制到解释器的输入。我们可以通过从解释器调用typed_input_tensor 来获取指向输入张量的指针。
memcpy(interpreter->typed_input_tensor<unsigned char>(0),
       resized_image.data,
       resized_image.total() * resized_image.elemSize());
此图总结了视频帧的整个尺寸转换管道。
运行推理
将输入数据准备并复制到输入张量后,我们终于可以运行推理了。这可以通过调用解释器的Invoke() 方法来完成。如果推理成功运行,我们可以通过从解释器获取typed_output_tensor 来恢复模型的输出张量。
if (interpreter->Invoke() != kTfLiteOk) {
    std::cerr << "Inference failed" << std::endl;
    return -1;
}

float *results = interpreter->typed_output_tensor<float>(0);
解释输出
每个模型都以特定的格式输出推理的张量数据,我们必须解释这些格式。在本例中,模型文档 指出输出是形状为 [1, 1, 17, 3] 的 float32 张量,存储以下信息
- 最后一维的前两个通道表示 17 个关键点的 yx 坐标(归一化为图像帧,即范围在 [0.0, 1.0] 中)(顺序为:[鼻子、左眼、右眼、左耳、右耳、左肩、右肩、左肘、右肘、左腕、右腕、左髋、右髋、左膝、右膝、左踝、右踝])。
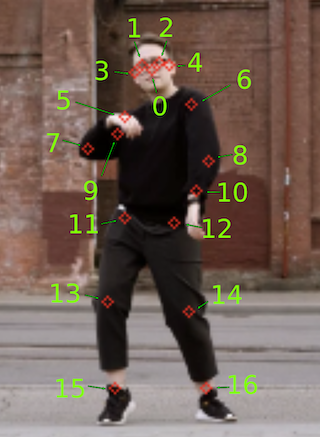
- 最后一维的第三个通道表示每个关键点的预测置信度分数,范围也在 [0.0, 1.0] 中。
我们创建了一个draw_keypoints() 辅助函数,它获取输出张量并组织不同的输出坐标以在视频帧上绘制姿态骨架。我们还考虑了输出的置信度,过滤掉置信度低于 0.2 阈值的结果。
const int num_keypoints = 17;
const float confidence_threshold = 0.2;

const std::vector<std::pair<int, int>> connections = {
    {0, 1}, {0, 2}, {1, 3}, {2, 4}, {5, 6}, {5, 7},
    {7, 9}, {6, 8}, {8, 10}, {5, 11}, {6, 12}, {11, 12},
    {11, 13}, {13, 15}, {12, 14}, {14, 16}
};

void draw_keypoints(cv::Mat &resized_image, float *output)
{
    int square_dim = resized_image.rows;

    for (int i = 0; i < num_keypoints; ++i) {
        float y = output[i * 3];
        float x = output[i * 3 + 1];
        float conf = output[i * 3 + 2];

        if (conf > confidence_threshold) {
            int img_x = static_cast<int>(x * square_dim);
            int img_y = static_cast<int>(y * square_dim);
            cv::circle(resized_image, cv::Point(img_x, img_y),
                       2, cv::Scalar(255, 200, 200), 1);
        }
    }

    // draw skeleton
    for (const auto &connection : connections) {
        int index1 = connection.first;
        int index2 = connection.second;
        float y1 = output[index1 * 3];
        float x1 = output[index1 * 3 + 1];
        float conf1 = output[index1 * 3 + 2];
        float y2 = output[index2 * 3];
        float x2 = output[index2 * 3 + 1];
        float conf2 = output[index2 * 3 + 2];

        if (conf1 > confidence_threshold && conf2 > confidence_threshold) {
            int img_x1 = static_cast<int>(x1 * square_dim);
            int img_y1 = static_cast<int>(y1 * square_dim);
            int img_x2 = static_cast<int>(x2 * square_dim);
            int img_y2 = static_cast<int>(y2 * square_dim);
            cv::line(resized_image, cv::Point(img_x1, img_y1),
                     cv::Point(img_x2, img_y2), cv::Scalar(200, 200, 200),
                     1);
        }
    }
}
安装 TensorFlow Lite 和 OpenCV 依赖项并构建项目
使用 Conan 使用 TensorFlow Lite 和 OpenCV 库非常简单。如果您查看项目的CMakeLists.txt,它对 Conan 没有特别之处。
cmake_minimum_required(VERSION 3.15)
project(pose-estimation CXX)

find_package(tensorflowlite REQUIRED)
find_package(OpenCV REQUIRED)

add_executable(pose-estimation src/main.cpp)

target_link_libraries(pose-estimation PRIVATE
                      tensorflow::tensorflowlite
                      opencv::opencv)
要使 Conan 安装库并生成使用 CMake 构建项目所需的文件,我们只需创建一个声明项目依赖项的conanfile.py。
from conan import ConanFile
from conan.tools.cmake import cmake_layout


class PoseEstimationRecipe(ConanFile):
    settings = "os", "compiler", "build_type", "arch"
    generators = "CMakeDeps", "CMakeToolchain"

    def requirements(self):
        self.requires("tensorflow-lite/2.10.0")
        self.requires("opencv/4.5.5")

    def layout(self):
        cmake_layout(self)
如您所见,我们只是在 ConanFile 的requirements() 方法中声明了依赖项。我们还将项目的layout() 声明为cmake_layout,因为我们使用 CMake 进行构建。您可以查看 Conan 文档的使用包教程部分以获取更多信息。
现在我们可以使用 Conan 来安装库了。它不仅会安装tensorflow-lite/2.10.0 和opencv/4.5.5,还会安装所有必要的传递依赖项。例如,对于运行 macOS Ventura 的机器,整个依赖项图将类似于以下所示
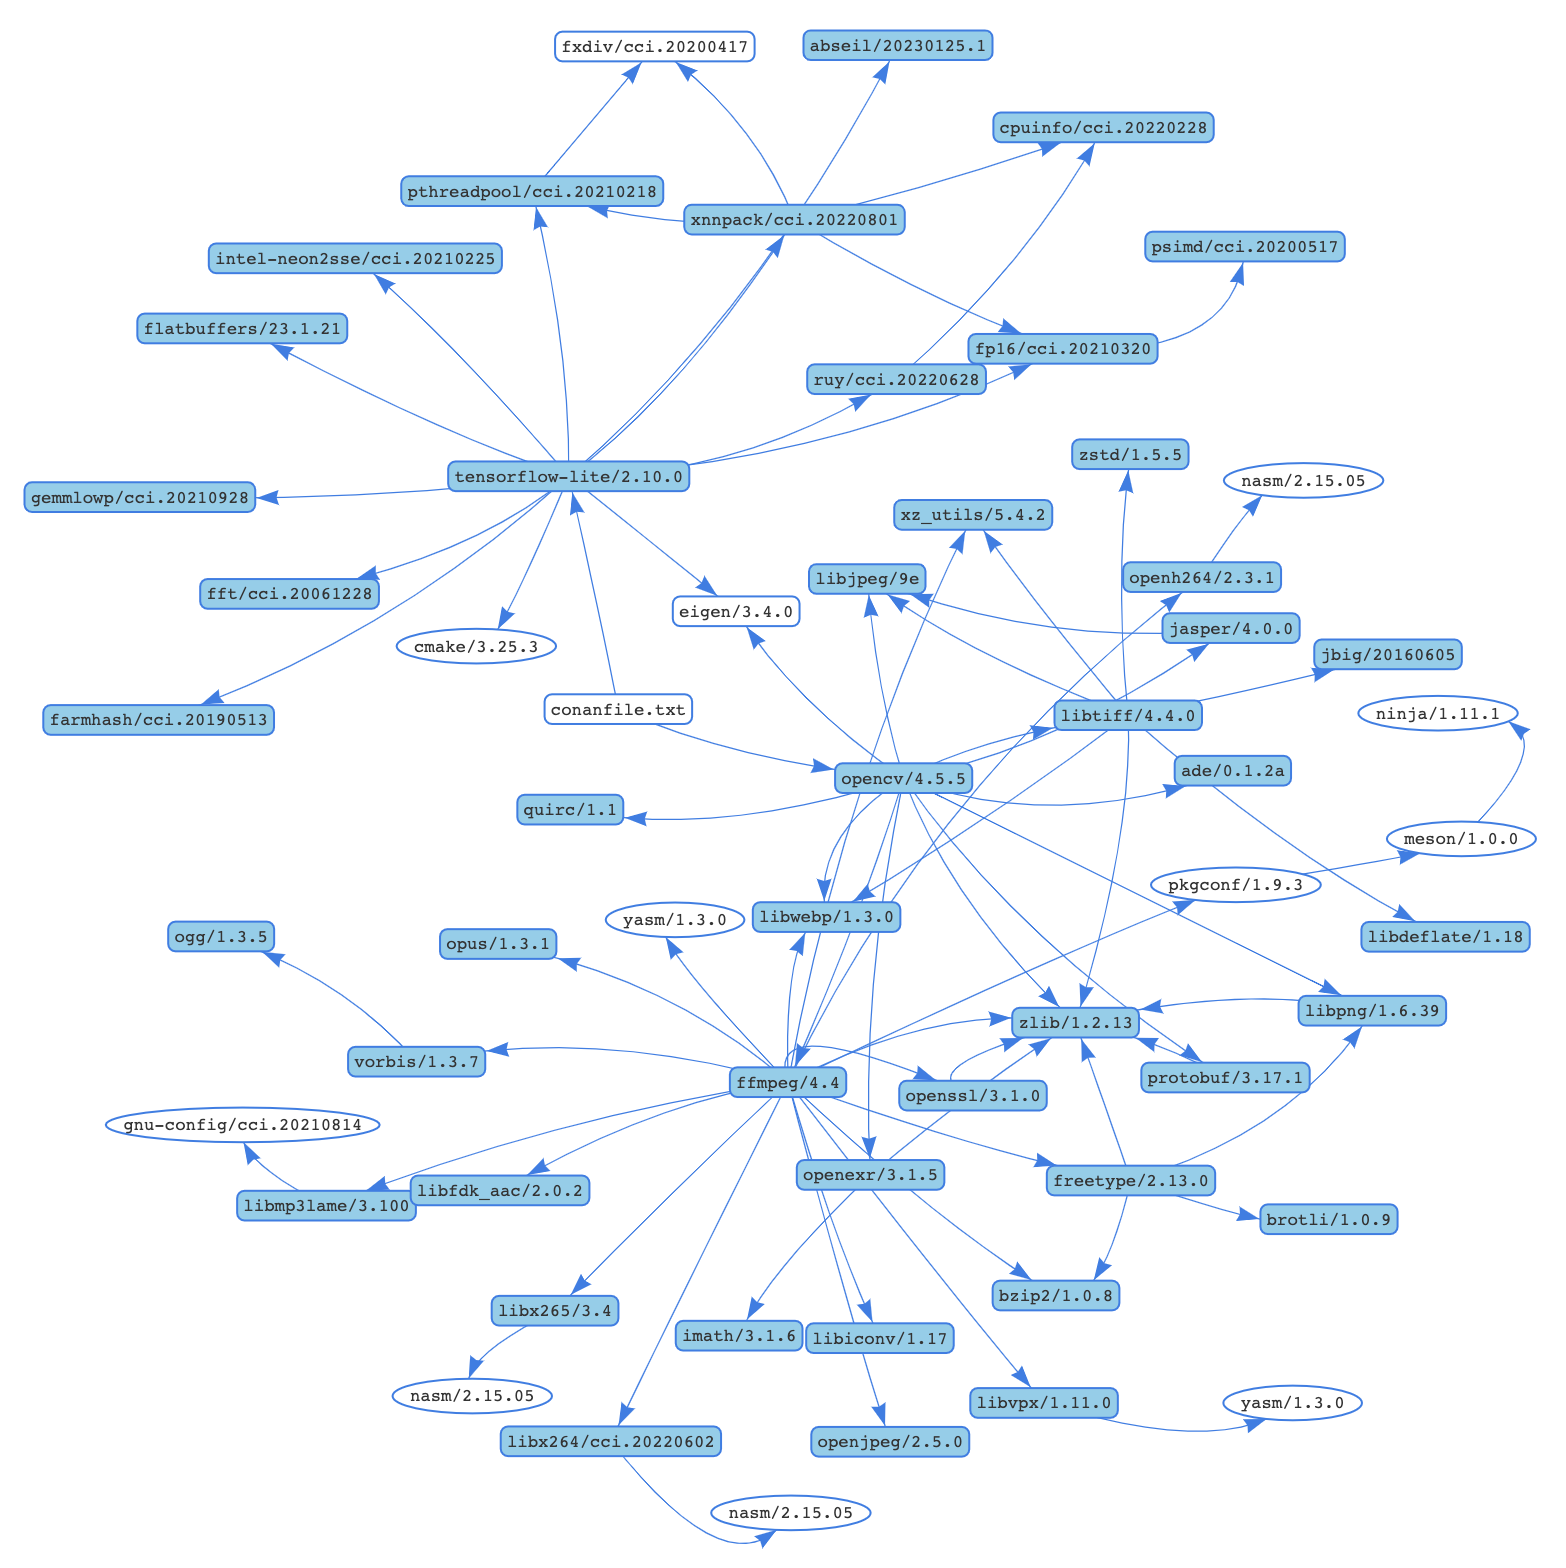
Conan 将尝试从默认的ConanCenter 远程安装这些包,它是开源 Conan 包的主要官方存储库。如果您的配置不可用预编译的二进制文件,您也可以从源代码构建。
conan install . -s compiler.cppstd=17 --build=missing需要考虑的一些事项
- 我们正在传递 C++ 标准的值,因为tensorflow-lite 库仅适用于高于 17 的标准。
- 如果远程不可用某些二进制文件,我们正在传递
--build=missing参数。 - 如果您正在运行 Linux 并且系统上缺少一些必要的系统库,则可能需要向命令行添加
-c tools.system.package_manager:mode=install或-c tools.system.package_manager:sudo=True参数(文档参考)。
现在让我们构建项目并运行应用程序。如果您安装了 CMake>=3.23,则可以使用 CMake 预设。
# Linux, macOS
cmake --preset conan-release
cmake --build --preset conan-release
build/Release/pose-estimation

# Windows
cmake --preset conan-default
cmake --build --preset conan-release
build\Release\pose-estimation.exe
否则,您可以为 CMake 添加必要的参数。
# Linux, macOS
cmake . -G "Unix Makefiles"
-DCMAKE_TOOLCHAIN_FILE=build/Release/generators/conan_toolchain.cmake
-DCMAKE_POLICY_DEFAULT_CMP0091=NEW -DCMAKE_BUILD_TYPE=Release
cmake --build .
./pose-estimation

# Windows. Assuming Visual Studio 17 2022
# is your VS version and that it matches
# your default profile
cmake . -G "Visual Studio 17 2022"
-DCMAKE_TOOLCHAIN_FILE=./build/generators/conan_toolchain.cmake
-DCMAKE_POLICY_DEFAULT_CMP0091=NEW'
cmake --build . --config Release
pose-estimation.exe
结论
现在您已经熟悉了在应用程序中使用 TensorFlow Lite 的基础知识,您可以探索其他模型。此外,通过体验安装和使用 TensorFlow Lite 和 OpenCV 等库的便捷性,您现在已具备创建包含更多库的更复杂应用程序的能力。要搜索 ConanCenter 中所有可用的库,您可以使用 conan search '*' -r=conancenter 命令。
-
视频由 Olia Danilevich 提供,来自 https://www.pexels.com/ ↩